This is part of an ongoing series of blogs giving a non-technical introduction to molecular modelling.
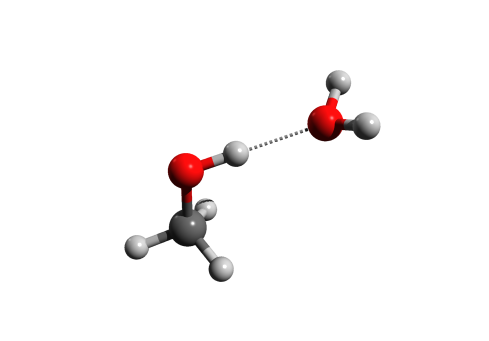
This post is in a slightly different topic than the usual. In chemistry, visualisation is often the key part of explaining something, and 3D molecular structure like this are indispensable:
There are lots of softwares available, both free and otherwise that can generate 3D molecular structures. One tool that’s very useful in creating that 3D perspective is POV-ray, a free open-source software that can generate really beautiful images by ray-tracing. This post will be on how to use that software via Avogadro, and also on how to add hydrogen bonds to the POV-ray generated image.
Installing POV-ray
This is very easy, just head over to the POV-ray website and download the official installer for Windows. If you are on Linux, then follow the instructions on this page. For Mac, you can find unofficial installers here.
Then you have to put the folder containing POV-ray executable on the PATH. The name of the executable and folder might be different in different versions. I am currently using POV-ray version 3.7.0 and in my case, the executable is C:\Program Files\POV-Ray\v3.7\bin\pvengine64.exe. So I have put the bin folder in PATH. If you don’t know how to do this, go through this guide for windows. (If you are on linux or mac, then you have to google) This step of putting the executable on path is really important, otherwise handling the program becomes more difficult.
You will also need to have the software Avogadro for dealing with molecular structures.
Generating ray-traced structures
First, draw or open some structure in Avogadro (part 1). Then go to File > Export > POV-ray… . A subwindow should open:
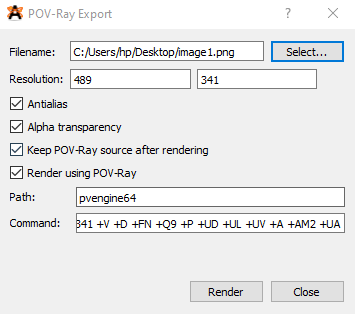
Avogadro POV-ray controls
Here press Select… to choose the save location and name for the final image file. Then set resolution, and check ‘Antialias’ and ‘Alpha transparency’ options. These will make the final image nicer looking, and have a transparent background. Also check the Render using POV-ray option. (The keep POV-ray source box keeps that POV-ray input file, even after the image has been created, and this does not affect the image in any way).
Finally, on the Path box, type in the name of the POV-ray executable that you have in your PC. In my case, this would be pvengine64. Then press Render. If everything is ok, then POV-ray should open, and the image should be generated. You will see something like this:
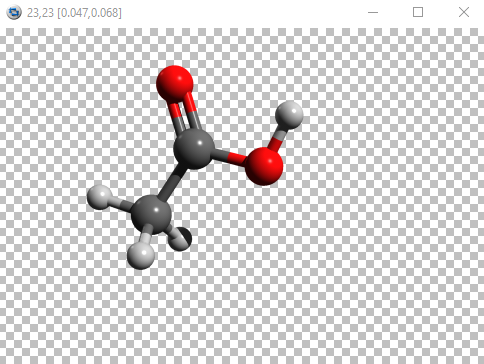
POV-ray image for acetic acid
Remember, the rendered image has the same orientation and size as the molecule in Avogadro, so you can rotate or zoom in/out to change it according to requirements.
Adding H-bonds to the diagrams
Now one of the problems of this method is that Avogadro does not include the hydrogen bonds in the POV-ray input file, so the final image does not have them, even if they are shown on Avogadro.
For example, try drawing a methanol-water dimer in Avogadro and then optimize it with MMFF94s force field. If you turn on the “Hydrogen bond” option on the left, you will see the H-bond as yellow dotted lines on the structure. If you then export it as POV-ray image, the hydrogen bond will be missing from the rendered image.
I do not know of a way to fix it from the inside of the software. However, there is a macro script that can add dashed bonds to POV-ray image. I got it from here.
#macro dashedLineL(_point1,_point2)
  #declare dashLength = 0.05;
  #declare lineRadius = 0.03;
#declare currentDashEnd = _point1;
  #declare currentDashStart = <0,0,0>;
  #declare lineDirection = vnormalize(_point2 - _point1);
  #while (vlength(currentDashEnd - _point1) < vlength(_point2 - _point1))
    #declare currentDashStart = currentDashEnd + (lineDirection * dashLength);
    #declare currentDashEnd = currentDashEnd + (lineDirection * (dashLength*2));
    cylinder{currentDashStart, currentDashEnd, lineRadius
      pigment { rgb <0.6,0.6,0.6> }
      finish { ambient 0.7 }
    }
  #end
#end
Then you just have to put in the following line to add a dashed hydrogen bond between atoms at (x1,y1,z1) and (x2,y2,z2)
dashedLineL(<x1, y1, z1> , <x2, y2, z2>)Now doing this manually can be tedious if there are multiple H-bonds to add, so I have written a small Python script that can be used directly from Avogadro. You can get this script here. Put the .py file in any location you want.
You have to install Python first for this to work. When installing don’t forget to put the python in the PATH. Then open Avogadro, and go to File> Export > POV-Ray… . Then edit the Path to: python . If the path to the script contains space then you have to put the whole path in double quotes, otherwise it will fail.

Then press Render. The image produced should now have Hydrogen bonds in it:
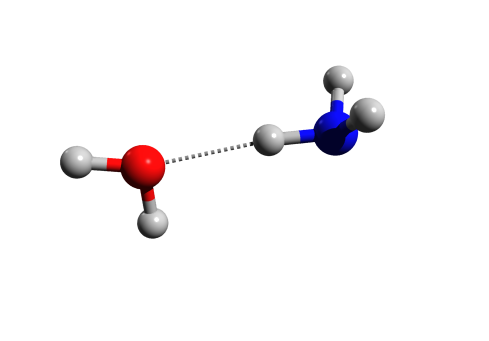
The way the script works is that it takes the POV-ray input file generated by Avogadro, and guesses the elements by their colour (so the default color scheme can’t be changed). It then checks if any N,O or F are close to any H (≤2.0 Å), and adds those hydrogen bonds to the input file, and finally calls the POV-ray executable with the arguments provided by Avogadro.
[Note that the script assumes that the POV-ray executable is in PATH, and is named “pvengine64.exe”. If you have a different version then you have to edit the .py file yourself]
That’s it! You can now make nice pictures of molecules yourself.
POV-Ray (Persistence of Vision Raytracer) : http://www.povray.org/